It should be OK to follow, some places are intentionally not very clear and only have generic action description where with a help of Apache manaul and Google you need to know what, where and how to do. If you find any error please report them to alo.peets@ut.ee
0.Make sure you did finish all the tasks of the previous weeks.
We expect here:
- all personal domains are configured, VM is referable by its FQDN from UT campus network (172.17.64.0/22) as well as from client machines ( over VPN ).
- mail server is configured and the VM is able to send and receive the mail from
teacher@teacher.est - IMAP/SMTP is configured - mail can be sent/received using remote IMAP/SMTP client (like Thunderbird)
- Spamassassin is configured and it can identify mail with a phrase "
this is a test text for custom spamassassin rule" as spam tester@<yourdomain>.estwillautoreplyto e-mail it receives, but won't reply to spam.
1.Setting up personal web server
We have already configured a mail host in our domain ( called mail.<yourdomain>.est ). Let's now add the web service as well having web host like www.<yourdomain>.est.
Installing the updates
It has been a while we did not pay attention at the announced updates, let's check if there are any.
Use the apt or aptitude package manager to update the local package indexes:
- Using
apt:# apt update- It is a good practice to do it each time you intend to install something with
apt
- In
aptitudeyou can just press "u" button.
In case you did use the aptitude, you may notice after updating the local indexes it suggests the new security updates. You may also notice that apart from security updates the are also a regular updates, those are less critical to install ( can be omitted ).
Use the aptitude's interactive interface to install the suggested security updates.
If you prefer the apt command line, refer to it's manual and find a way to install the security updates
- You may find out that there is no explicit way to tell
aptto install just the security updates omitting regular ones. - Therefore
aptitudeis more preferable for this task (gives a possibility to select what to update). - I you decide to update everything, then it is enough to use
apt.
After installing the updates the system has to remain operational, with no regression introduced.
Understanding DNS CNAME records
Sometimes there is a need for one system to have multiple DNS names, all pointing to the same IP. This could be the case when hosting multiple virtual web servers or running multiple services on the same IP using service-specific host names, like:
- www.yourdomain.est
- ftp.yourdomain.est
- myservice.yourdomain.est
We could create a number of A type records pointing to the same IP address. However the good style is to have a PTR type record for each A or AAAA type record, and if multiple A records point to the same IP, the reverse can be do only for one of them. Therefore good style in this case is to select only A record and assign it's PTR correspondingly, like:
- A : teacher-vm.teacher.est -> 127.17.65.162
- PTR : 172.17.65.162 -> teacher-vm.teacher.est
... and the rest of the host names which are pointing to the same IP address should be assigned using CNAME aliases:
- CNAME: www.teacher.est -> teacher-vm.teacher.est
- CNAME: ftp.teacher.est -> teacher-vm.teacher.est
- CNAME: myservice.teacher.est -> teacher-vm.teacher.est
A CNAME record maps a name (alias) to another name (real name). Resolving CNAME record takes two steps - first, the alias is resolved to the real name, then the real name is resolved to the IP address (using A record). If a (real) name has multiple CNAME aliases pointing to it, one just needs to change the real name's type A record to "move" all the names to a new IP address.
There can be however not reverse record for CNAME aliases, the corresponding IP will be always resolve to the actual A record.Additionally the MX records and NS records can be only in use with A or AAAA records, we cannot assign them pointing to CNAME records.
More details about Canonical Name Record (CNAME) with examples you can read here ... http://www.zytrax.com/books/dns/ch8/cname.html.
Next we will create five CNAME aliases that will be used in the following tasks - for creating virtual web hosts. All aliases we use in lab are fixed by the lab instructions for easy automated testing.
- In the (
yourdomain.est) zone file, add followingCNAMErecords:wwwpointing toyourhostnamewebmailpointing toyourhostnamemonitorpointing toyourhostnameinfopointing toyourhostnametestpointing toyourhostname
- Think of the other routines (actions) that are required when changing Zone files.
Before proceeding, test if the new CNAME records work:
nslookup webmail.yourdomain.estnslookup www.yourdomain.estnslookup monitor.yourdomain.estnslookup info.yourdomain.estnslookup test.yourdomain.est
If it does not work, please make sure you did all DNS routines properly.
Virtual Web Hosts Using Apache Web Server
Apache is the most popular web server software in use (as of March 2012). Apache supports wide variety of features and can be extended with modules. We will use the virtual host functionality to set up multiple web hosts on the same web server.
- Install
Apache Web Server# apt install apache2
- Add the
firewall ruleto accept packets on porttcp/80. Don't forget to save the rules! - Add the default Security group in
ETAIScalledwebwithtcpports80and443to your Virtual machine.
Check if you can access the default web page:
- Install text-based browser called
lynxand enter a commandlynx http://www.<your-domain>.est. You should see a text-based version of Apache default page. - Check if you can ping your virtual machine from personal computer (laptop)
$ ping 172.17.64.Xor$ ping www.<your-domain>.est(last will work if your bind9 configuration is right) - If previous steps are successful then in your web browser type address
http://172.17.64.Xorhttp://www.<your-domain>.est
In Debian Stretch, the main configuration file for Apache is /etc/apache2/apache2.conf, which includes other conf files like ports.conf, httpd.conf, etc. Despite the fact that it is not really important, which conf file you use, it is recommended to keep different aspects of the setup in different .conf files. It also offers better flexibility, when adding and removing different web applications and modules. When some parts of the configuration are kept in separate .conf files it is easier to navigate the setup and enable/disable blocks of instructions. For example directive Include mods-enabled/*.conf will load every .conf file in this directory and their instructions will be automatically included in the Apache configuration, everything else will be ignored. This way, adding or removing a bit of functionality can be just a matter of creating an appropriate my-functionality.conf file or changing the file extension to something other than .conf. For example - to my-functionality.conf.disabled without editing the actual .conf files
The log files for the Apache web server are located in the /var/log/apache2 directory. Query (access) logs and error logs are kept separately. It is also a good practice to have a separate log file for each virtual host.
Extra reading:
- The Apache HTTP server project
- Apache version 2.4 Documentation
- Debian specifics (Apache configuration guide)
During this lab we will configure Apache to use name-based virtual hosts. With name-based virtual hosting, the server relies on the client to report the hostname as part of the HTTP headers. Using this technique, many different hosts can share the same IP address.
First, configure the actual virtual hosts. We will create a virtual host for www.<your-domain>.est and for every CNAME we defined in the previous task.
Apache httpd documentation:Virtual Host and more specifically Name-based Virtual Host
Repeat following actions for www.<yourdomain>.est, webmail.<yourdomain>.est and test.<yourdomain>.est and :
- Create a virtual host root directories. The contents of these directories will be published to web via HTTP. For
www.<your-domain>.est,/var/www/htmldirectory is created during apache installation for default page (usually web pages are located in /var/www folder). For other virtual hosts, create/var/www/vhosts/name-of-the-virtual-hostdirectories (like webmail that you defined as a CNAME; e.g./var/www/vhosts/webmail). - Create a configuration file for each virtual host. The file must be in the
/etc/apache2/sites-available/directory. As the file name, usevirtual-host-name.conf- e.g.webmail.conf,<your-domain>.conf, ... - Into the virtual host configuration file just created, add the configuration directives to define a new name-based virtual host. This is just an example (given below), you should insert correct values
<VirtualHost *:80> ServerName InsertRightValueHere DocumentRoot InsertRightValueHere ErrorLog ${APACHE_LOG_DIR}/InsertRightValueHere-error.log # Possible values include: debug, info, notice, warn, error, # crit, alert, emerg. LogLevel warn CustomLog ${APACHE_LOG_DIR}/InsertRightValueHere-access.log combined </VirtualHost> - Overview of the important parameters/directives for the virtual host you will need to set:
ServerName- the full DNS name for virtual host i.e.webmail.teacher.estDocumentRoot- virtual host root directory, for webmail would be/var/www/vhosts/webmailErrorLog,CustomLog- error log and access (query) log for the virtual host - the name and location of log files can be set to any value, but we recommend to stick to common values e.g.:${APACHE_LOG_DIR}/webmail-error.logand${APACHE_LOG_DIR}/webmail-access.log combined- For easier troubleshooting change
LogLeveltodebug
NB! Did you complete this activity to all three (3) virtualhosts www, webmail and test.
Apache main conf file apache2.conf second-to-last line is IncludeOptional sites-enabled/*.conf what states that all conf files from sites-enable folder will be included (added) at the end of main conf file. Include basically copy-pastes (i.e. adds) sub-configuration files to the particular conf file. The folder sites-available just contains declarations (configuration) for all available sites. Therefore, in order to enable particular site, we need to make a link to these files in the sites-enabled folder. Declaration file can also be copied there, but it is strongly recommended to make a link instead (in order to avoid duplication and nonstandard configuration).
Fortunately, apache2 distribution has special tools for that:
# a2ensite site-name(will enable or make the link)# a2dissite site-name(will disable or remove the link)# a2enmod mod-name(will enable module or in other words - make the link)# a2dismod mod-name(will disable module or in other words - remove the link)
- Disable
defaultsite.- e.g.
a2dissite 000-default.conf
- e.g.
- Enable
www,webmailandtestweb-sites.- e.g
a2ensite webmail.conf
- e.g
Before we restart apache we should check if the configuration is OK for this run:
# apache2ctl configtest(should returnOK!)- Restart apache service.
systemctl restart apache2.service)
Try accessing your web servers:
http://www.teacher.est(just to test if you can access any.estaddresseshttp://www.<yourdomain>.esthttp://webmail.<yourdomain>.esthttp://test.<yourdomain>.est- You should see an empty page saying Index of /

You may have noticed that all of your pages are empty. The next step is to create some content for the virtual hosts. In order to do that you need to be familiar with basic HTML tags and how web page is constructed. If needed refer to very good public tutorials here https://www.w3schools.com/html/html_intro.asp and https://www.w3schools.com/html/html_basic.asp .
- In the root directory for each virtual host, create an
index.htmlfile. The content of this file can be freely chosen, but the files of different virtual host must be different and clearly state whichindex.htmlfile it is displaying. - For the
www.<your-domain>.estvirtual host, create anindex.htmlfile that contains links to front pages to the rest of the virtual hosts. NB! These links will be used by the testing system to locate your virtual hosts.
You do not need to restart Apache service as the pages will be re-read each time. If you visit your pages again you should see your personal demo pages now.
Sometimes modern web browsers don't understand page has been changed and just displays local cache version therefore if in doubt always refresh with <CTRL> + F5 key.
Now you have a working web server that can serve 3 different sites. Lets add more functionality to it by allowing each user to have their own personal web page also. There is a special module in Apache to allow users to maintain their own web pages called userdir. It would be very easy just to modify its config in mods-available/userdir.conf and then enable it with command a2enmod userdir . however it will allow it to all virtualhosts hosted in your server. That is not acceptable behavior in many cases and you would want to enable module one particular site only.
For the www.<your-domain>.est virtual host, enable the user web pages functionality (enable userdir module) - set the UserDir directive to public_html (in <your-host> site declaration). The rest of your virtual hosts must not be affected by this configuration!
- As the
testeraccount, create apublic_htmldirectory under the account's home directory. The access rights forpublic_htmldirectory must be705, access rights for thetester's home directory must be701. - In the
public_htmldirectory, create anindex.htmlfile with text "tester user homepage" so our tester can verify its served properly. - For almost every module you have appropriate configuration file in mods-available folder. Check the content of userdir module configuration file and change it if needed.
- Disable userdir module for cloud generated default user called
debian(you have to figure out which parameter and how to change yourself).- Hint userdir module is disabled for
rootuser by default.
- Hint userdir module is disabled for
- Disable userdir module for cloud generated default user called
- In order to allow specific module or configuration to only one site its configuration needs to be added to only that particular virtualhost configuration file. Your first idea might be to copy
userdir.confcontent towww.<yourdomain>.estconfig file, but it wont work as you also need to copy content ofuserdir.loadthat actually loads the module. Better way to enable specific module for specific Virtualhost is to add aIncludestatement to it into Virtualhost configuration file you want to enable it. Difference with normal configuration scripts available inconf-availablefolder is that you also need to load a specific*.loadfile and this must be before module*.conffile. If you *.load for 2 or more virtualhost configurations you would get Apache warning module already loaded etc... So nice thing would be to check if module is loaded before adding it to configuration. Therefore in www Virtualhost configuration file add following lines:
<IfModule !mod_userdir.c>
  Include mods-available/userdir.load
</IfModule>
  Include mods-available/userdir.conf
- More about Apache
Includedirective can be read here https://httpd.apache.org/docs/current/mod/core.html#include
- More about Apache
- If you have not now you should disable
userdirmodule with commanda2dismod userdir
Use the # apache2ctl configtest to test if syntax is OK or if all the configuration files are visible and can be loaded by Apache.
Now it is time to restart the Apache httpd server.
- Enable and start/restart the Apache web server (service name is
apache2)# apache2ctl restart
There are situations when you want to restart your Apache server, but can't interrupt it's work. Imagine that you have few hundred clients currently downloading files from your server and you need to avoid disconnecting them. In such situations you can use the following command:
# apache2ctl graceful
This will gracefully restart your Apache server with new configuration without affecting your client's connections.
Test by accessing the web pages:
- View the web pages for all the virtual hosts created, make sure that you are getting the right content for each virtual host.
- try
http://www.<your-domain>.est - try
http://webmail.<your-domain>.est - try
http://monitor.<your-domain>.est - try
http://<your-domain>.esthttp://<your-domain>.estwill display first availablevirtualhostconfiguration and normally it is alphabetically first one insites-enabledfolder. Keep it in mind we will fix it later.
- try
- Look at different user web pages
http://www.<your-domain>.est/~tester/- OKhttp://www.<your-domain>.est/~mailuser/- Forbiddenhttp://www.<your-domain>.est/~debian/- Not Foundhttp://webmail.<your-domain>.est/~tester/- Not found
- In the
/var/log/apache2/directory, look at the access and error logs for your virtual hosts. ** Understanding error messages are important part of system administration. Some future tasks (e.g. exam) may require you to get the troubleshooting information from the Apache logs independently.
PHP7.0 for Apache Server
In the LAMP the PHP is one of the most popular choice and there are a lot of free of charge solutions available. We will install two of such web-based solutions - the Roundcube mail and phpMyAdmin applications later during this lab. But first, we need to prepare the environment and install the PHP7 support.
Install the php7 package:
# apt install php7.0 php7.0-mysql
- The installation process should also automatically include corresponding Apache module, so we just need to check if it works.
- Create new virtual host description for
info.<yourdomain>.est- Refer to previous parts of manual how to do it.
- Dont forgot to
enable the siteand make aDocumentRootfolder for it - Restart web server after installation:
# apache2ctl restart
- Create a file containing the information for PHP installed on the system. This function should return general php information. The file should be located in
/var/www/vhosts/info. The file name should beindex.php.
<?php echo phpinfo(); ?>
- Check if you can access the
PHPinfo page underhttp://info.<your-domain>.est

Configuring Alias, Location, Directory, Require
The Alias directive allows documents to be stored in the local filesystem other than under the DocumentRoot. URLs with a (%-decoded) path beginning with URL-path will be mapped to local files beginning with directory-path. The URL-path is case-sensitive, even on case-insensitive file systems. Alias allows to define a specific URL and map it to a file/directory.
The <Directory> directive apply directives to parts of the filesystem. Directives enclosed in a <Directory> section apply to the named filesystem directory and all sub-directories of that directory (as well as the files in those directories). The <Location> directive, on the other hand, change the configuration for content in the webspace. It is similar to the <Directory> directive, and starts a subsection which is terminated with a </Location> directive. <Location> directive works only for URLs (the part after your site domain name, e.g. http://webmail.<your-domain>.est/mylocation). You would use <Location> if you need to fine tune access rights by an URL and <Directory> if you need to fine tune access to a specific folder in filesystem.
- create a new folder called
funny-picturesastesteruser at testerhomefolder- copy / download into
/home/tester/funny-picturesat least 3 pictures (i.e. https://opengameart.org provides archives with free / open images)
- copy / download into
- Edit
test.<your-domain>.estconfiguration file and addaliasstatement sotest.<your-domain>.est/imageswill be served from/home/tester/funny-pictures - Try to understand if <Directory> directive is needed? PS! If yes add it.
- Read about
Requiredirective and allow everybody access toaliasanddirectoryhttp://httpd.apache.org/docs/current/mod/mod_authz_core.html#require
- Read about
- restart Apache service
-
http://test.<your-domain>.est/imagesshould display list of files in web-server/home/tester/funny-picturesfolder
- Under the info site configuration (
info.<your-domain>.conf):- add alias
/phpinfoshould point to/var/www/vhosts/info - add
<Location>directive for/phpinfoso that the PHP info pageinfo.<your-domain>.conf/phpinfois only accessible from machines in your domain.- Between the
<Location>directives add the following lines:
- Between the
- add alias
Require host <yourdomain>.est
Require ip 127.0.0.1
Require ip 172.17.65.162
- Apache processes virtual hosts in alphabetical order, and server administrators can prioritize Apache's virtual host processing by prefixing a virtual host's configuration file name with a number. Therefore, if
info.<your-domain>.confis not alphabetically first file in/etc/apache/sites-enableadd a 0 (zero) in the the info site configuration file name, so it will be served first when accessinghttp://127.0.0.1:80
Now http://info.<yourdomain>.est/ should still work but http://info.<yourdomain>.est/phpinfo/ should result in Forbidden You don't have permission to access /phpinfo/ on this server.
- You can use
lynxlocally from VMlynx localhost/phpinfoto test your web-server
How to test if it works from personal machine / laptop:
- Windows (Putty)
- Open Putty and
Load(do not connect yet) your default connection you would use to connect to you VM - in the menu on the left click on
SSHand under that onTunnels. Under the Add new forwarded port add10080as source port and127.0.0.1:80as destination. Click Add.
- Open Putty and

(image is borrowed from the dd-WRT wiki
- In Putty in the left menu open
Sessionand add your machine's IP address as the host name and open the session. - When you open a browser and type in
localhost:10080/phpinfo, it should show thephpinfodirectory in the broswer. If you click onindex.php, it should show correct information. You can also access this page directly when typinglocalhost:10080/phpinfo/index.phpin the address bar in the browser.
- In Putty in the left menu open
- Linux
- In terminal enter command
ssh -L 10080:127.0.0.1:80 YourUserName@YourMachineIp
- This does the same thing as in Windows. The flag
-Lsays we’re doing local port forwarding. Then it says we’re forwarding our local port10080to the IP address127.0.0.1on port80using the usernameYourUsernameand IP addressYourMachineIP. - if needed specify correct
private keyyou normally use to connect to your VM.
- This does the same thing as in Windows. The flag
- When you open a browser and type in
localhost:10080/phpinfo, it should show thephpinfooutput.
- In terminal enter command
Apache httpd status module (mod_status)
The mod_status module for the Apache httpd server enables the administrator to get some basic information about the running Apache processes and the queries being served. The module is loaded by default, but the URL to serve the status information must be specially configured.
Apache httpd documentation: mod_status
- Enable the
statusmodule only forinfo.<your_domain>.estVirtualhost - Read Apache manual and as specified there enable
info.<your_domain>.est/server-statusonly for:localhost,172.17.65.162,<yourdomain>.estand your personal machine. - For easier testing lets also enable it for whole site. In virtualhost configuration (outside any location directive) put following lines:
 DirectoryIndex disabled
 SetHandler server-status
- Inside
<Location "/phpinfo">directive add 2 lines:
 DirectoryIndex index.php
 RemoveHandler server-status
- Test if
info.<your_domain>.estis available from your client machine - Test that
info.<your_domain>.est/server-statusis only served from allowed clients - Test that
www.<your_domain>.est/server-statusis not available for nobody
Apache module (mod_info)
Apache module (mod_info) - Provides a comprehensive overview of the server configuration
You should read more about it here http://httpd.apache.org/docs/current/mod/mod_info.html
- Configure
mod_infomodule only to be available forinfo.<your_domain>.est/server-infoaddress- We can achieve it by enabling module
info(NB! Enable moduleinfonow) - Look at the content of
mods-enabled/info.conffile and copy the content of it intoinfo.<your_domain>.estconfiguration file. - Now you can remove the
mods-enabled/info.conffile.- PS! Do not remove
mods-enabled/info.loadfile.
- PS! Do not remove
- Edit the configuration copied from
info.confearlier so that/server-infoshould be similarly to/server-statusand/phpinfoonly accessible from:localhost,172.17.65.162,<yourdomain>.est,- your personal client machine / laptop.
- We can achieve it by enabling module
try accessing info.<your_domain>.est/server-info from your client machine. Please take few minutes and try to go through all of the output (it will help you a lot in the exam).

HTTP authentication
For the test.<your_domain>.est that we created earlier we are going to try different authentication modules: htpasswd utility and Pluggable Authentication Module (PAM). They both use HTTP Authentication.
Please refer to http://httpd.apache.org/docs/current/mod/mod_auth_basic.html and http://httpd.apache.org/docs/current/mod/mod_authn_core.html#authtype if in need of example configuration.
First, we are going to implement htpasswd utility.
- In the
testsite configuration file, create a newAliasnamed/secure, add the correct<Location>directive for theAliasto be available from everywhere for easier testing - Inside the
<Location>directive we are going to usehtpasswdutility.- Set
AuthTypetoBasic - Set
AuthUserFileto/etc/htpasswd/.htpasswd - Set
AuthNameto "Login with htpasswd utility!" - Set
Requiretovalid-user. This will enable that all the users specified in the.htpasswdfile get access when entering correct username and password.
- Set
htpasswdutility is already installed with Apache server. So we only need to create the.htpasswdfile now.- Make a new directory called
htpasswdunder directory/etc. - Go inside the newly created directory. When running command
pwd, the correct output should be/etc/htpasswd. - To create a new
.htpasswdfile, run the commandhtpasswd -c /etc/htpasswd/.htpasswd UserNameHere
This will ask for a password for theuseryou are adding to the.htpasswdfile. - To add users to
.htpasswdfile, run the commandhtpasswd /etc/htpasswd/.htpasswd UserNameHere
- Make a new directory called
- Open browser and navigate to
http://test.<your-domain>.est/secure. e.g.http://test.teacher.est/secure. - If the browser asks for username and password, enter the username and password that you added to the
.htpasswdfile. The correctAuthNametext should also be displayed in the dialog box.- Firefox and IE show the
AuthNamein the dialog box. The newest version of Chrome doesn't.
- Firefox and IE show the
- If the correct page is displayed, then
htpasswdutility is configured properly.
Now we are going to implement PAM authentication.
- Install
PAMpackages.
# apt install libapache2-mod-authnz-external pwauth
- Enable
authnz_externalmodule. - In the
testsite configuration file, create a newAliasnamed/pam, add the correct<Location>directive for theAliasto be available from everywhere for easier testing - In the same configuration file as in the last point, add the following lines:
<IfModule mod_authnz_external.c>
  AddExternalAuth pwauth /usr/sbin/pwauth
  SetExternalAuthMethod pwauth pipe
</IfModule>
This will add PAM to the external authentication list if the authnz_external module is enabled.
- Inside the
<Location>directive we are going to usePAM.- Set
AuthTypetoBasic - Set
AuthNameto "Login with PAM" - Set
AuthBasicProvidertoexternal - Set
AuthExternaltopwauth - Set
Requiretovalid-user. This will enable that all the users that are in the system get access when entering correct username and password.
- Set
- Open browser and navigate to
http://test.<your-domain>.est/pam. - If the browser asks for username and password, enter the username for your account in the system and your password for the account. The correct
AuthNametext should also be displayed in the dialog box.- Firefox and IE show the
AuthNamein the dialog box. The newest version of Chrome doesn't.
- Firefox and IE show the
- If the correct page is displayed,
then PAM module is configured properly.
MySQL Relational Database Management System
Lab instructors would like to reference two (main) sources for extra reading and understanding https://workaround.org/ispmail/stretch/install-software-packages and https://vorkbaard.nl/installing-a-mailserver-on-debian-8-part-2-preparations-apache-lets-encrypt-mysql-and-phpmyadmin/ . These references after being modified are also basis of Roundcube installation manual here.
Some of the software packages we are about to set up will require a RDBMS back-end. We will use the MySQL software as our database management system mysqladmin - Client for Administering a MySQL Server
The MySQL server is the software that will store information about your email accounts and domains. In previous versions this package was called “mysql-server”. MariaDB is a fork of MySQL which was bought by SUN Microsystems which was later bought again by Oracle. Its original developer Monty was not happy with Oracle and thus maintained the software under the new name MariaDB. Maria and My are names of his children. So basically MariaDB is what you knew as MySQL. Even though we are using and referencing MySQL in this manual in many cases it actually installs MariaDB so don't be surprised to see MariaDB name instead of MySQL in some places if completing the tutorial.
Install MySQL Client and Server software:
# apt-get install mysql-server mysql-client- Opposed to the previous MySQL packages in previous Debian distributions MariaDB will not ask for a password for the database administrator (also called “root”). Instead you will be able to manage all databases by just running
mysqlin your shell when you are logged in as “root”. - By default installer should start the
mysqlservice and enable it on startup, but it is a good practice to check it.
- Opposed to the previous MySQL packages in previous Debian distributions MariaDB will not ask for a password for the database administrator (also called “root”). Instead you will be able to manage all databases by just running
Try to log in using MySQL's command line client:
# mysql
You can check databases available with:
mysql> SHOW DATABASES;
Run exit command to log out.
So now lets set up database users and tables.
With the MySQL command line tool, log in to your MySQL server:
# mysql
Now you are connected to the database and can issue SQL commands. First create the database:
- mysql>
CREATE DATABASE roundcubemail;
We also need to create a MySQL user called ‘mailuser’ that gets access to that database. Instead of “ChangeMe” use the password you prefer.
- mysql>
CREATE USER 'mailuser'@'127.0.0.1' IDENTIFIED BY 'ChangeMe1';
…and mailadmin user to allow you to manage the database:
- mysql>
CREATE USER 'mailadmin'@'localhost' IDENTIFIED BY 'ChangeMe2';
The admin needs read and write access to the database:
- mysql>
GRANT ALL ON roundcubemail.* TO 'mailadmin'@'localhost';
The other account just needs read permissions:
- mysql>
GRANT SELECT ON roundcubemail.* TO 'mailuser'@'127.0.0.1';
Lets add a mailtester account with read-only permission and password 12345 too.
- mysql>
CREATE USER 'mailtester'@'localhost' IDENTIFIED BY '12345'; - mysql>
GRANT SELECT ON roundcubemail.* TO 'mailtester'@'localhost'; - mysql>
SELECT User, Host, Password FROM mysql.user; - mysql>
exit
Note: PhpMyAdmin by default connects to the database at “localhost” – which is the same server. We will create a database user “mailadmin” who will be able to connect to “localhost”. However the user “mailserver” which is used by the server processes will connect to “127.0.0.1”. Wait, what? Isn’t that the same as “localhost”? Usually it is. But MariaDB and MySQL make a difference. If you initiate a database connection to “localhost” then you talk to the socket file which lives at /var/run/mysqld/mysqld.sock on your server. But if you connect to “127.0.0.1” then it will create a network connection talking to the TCP socket on port 3306 on your server. So our database user ‘mailserver’@’127.0.0.1’ cannot be used in PhpMyAdmin (unless we alter its configuration). But the user ‘mailadmin’@’localhost’ can. Are you still with me? So why do we use ‘127.0.0.1’ then anyway? The reason is that Postfix will be restricted to its home directory at /var/spool/postfix. And as the “mysqld.sock” socket lives outside of that directory we need to use a TCP communication to break out of the jail. Phew… crazy. 🙂 Credits for explanation go to ...https://workaround.org/ispmail/stretch/preparing-database
phpMyAdmin
phpMyAdmin is a web-based MySQL administration tool. Advantages are obvious - due to web interface administrator(s) can access and manage the database from any machine that has the browser.
Extra reading:
Install the phpMyAdmin package:
# apt-get install phpmyadmin
PHPMyAdmin creates an own small SQL database on your server to store configuration data. So you will get asked:
- Choose yes to configure database with
dbconfig-common
- Choose yes to configure database with
The installer will also create a database access user to allow PHPMyAdmin to access its own database. That password does not matter much to you.
- Just press
Enterto get a randomly created password:
- Just press
You will also get asked which web server software you want to use. Select Apache:
- Choose
apache2server (need to press space to select)
- Choose
The installer will create a file /etc/phpmyadmin/apache.conf that needs to be included in your Apache virtual host so you can access with your web browser. Edit the file /etc/apache2/sites-available/test.<yourdomain>.est.conf and put this line anywhere between the <VirtualHost> and the </VirtualHost> tags but before any other “Include” lines:
Include /etc/phpmyadmin/apache.conf
It is recommended to disable PhpMyAdmin for any other virtual hosts you are running:
# a2disconf phpmyadmin
Otherwise all of your web sites will provide a /phpmyadmin path. That may be confusing and even tempt you to use it on a HTTP (=unencrypted) connection accidentally. For easier access we do not set up IP restrictions for /phpmyadmin
Reload the Apache process:
service apache2 reload
Open your web browser and point it to http://test.<yourdomain>.est/phpmyadmin. It will show the PHPMyAdmin login form:

- Username:
mailtester - Password:
12345
- Username:
Try also logging in with mailadmin and familiarize yourself with phpadmin user interface.
Roundcube Webmail
Roundcube is PHP web application that allows to have a web based access to user's email box and send emails. The php scripts behind roundcube assume you have SMTP and IMAP servers somewhere running: those are needed to access the email box (IMAP) and send email (SMTP). Therefore please make sure both IMAP and SMTP servers are 100% working (previous lab finished). In addition the Rouncube needs to store its runtime data and the database is preferred option here, hence the need for installing DB instance. We have configured MySQL and we will reuse it for Roundcube.
Now lets install roundcube
# apt install roundcube roundcube-plugins roundcube-plugins-extra php-net-sieve
Take a look at the file /usr/share/roundcube/SQL/mysql.initial.sql (that can be used to create default database for roundcube). So let the database magically be created...
# mysql roundcubemail < /usr/share/roundcube/SQL/mysql.initial.sql
Now lets enable alias /roundcube and with it whole roundcube
# nano /etc/apache2/conf-enabled/roundcube.conf- Uncomment line
Alias /roundcube /var/lib/roundcube
- Uncomment line
- Restart Apache service
You may test if activities were done OK by accessing the roundcubemail database schema from the web base phpMyAdmin DB management facility:
- Navigate your browser to:
http://test.<yourdomain>.est/phpmyadmin - Login using the mailadmin user and its password you specifyied
- Once login is successful you should see the
roundcubemailschema in the left, you should be able to browse it's tables.
- Once login is successful you should see the
You can also already try to log into roundcube web interface
- Navigate your browser to:
http://webmail.<yourdomain>.est/roundcube- This attempt should end with and error
Unable to connect to Database
- This attempt should end with and error
- Have a look at
head /var/log/roundcube/errorscan you identify the problem?
Now we have all the software we need for roundcube to work installed, but as expected they need some initial (additional) configuration. https://github.com/roundcube/roundcubemail/wiki/Configuration is a good start to read extra why and where we need to modify. It states clearly that we need to fix Database connection, IMAP server connection and SMTP server connection.
All roundcube configuration is available at /etc/roundcube
- Look at the
config.inc.phpfile, search for thedb_dsnwsettingnano->CTRL+W->search word->ENTER:- you may notice that only occurrence is in the comment ...
Do not set db_dsnw here, use dpkg-reconfigure roundcube-core to configure database ! Basically what it says is that you should run the command dpkg-reconfigure roundcube-core command and everything would be configured automatically for you. Dont do it yet, we will complete the task manually (for educational purposes) and then will reinstall everything with automated installation.
Add a following line at the end of file /etc/roundcube/config.inc.php
$config['db_dsnw'] = 'mysql://mailadmin:secretpassword@localhost/roundcubemail';- The word "secretpassword" has to be replaced with the password that you chose for the
mailadminuser earlier. - Restart Apache service (YES Apache as roundcube is not a separate service but a configuration / webpage in Apache)
- The word "secretpassword" has to be replaced with the password that you chose for the

- Visit
http://webmail.<yourdomain>.est/roundcubeand try to log in:- Create a new user called
mailtesterwith password12345if its not it yet please change so teachers could test your roundcube. - Server:
localhost - it should work and you should be capable of sending and receiving e-mail.
- Create a new user called
- Log out and log in again with
http://webmail.<yourdomain>.est/roundcubeand try to log in:- User:
mailtester - Password:
12345 - Server:
<yourdomain>.est(e.g. teacher.est) - it should not work and result in error displayed clearly in
dovecotlog file...
- User:
cat /var/log/dovecot/dovecot.log. (YES it is dovecot ... as once again roundcube is not "proper" service on its own thus does not provide method for authentication, roundcube uses IMAP that we configured in dovecot and already used to connect with Thunderbird. Only problem is that we configured it to not allow log in with cleartext passwords, but as we have not configured our Apache to be secure yet we are not allowed to log in.)


To test our theory lets enable plaintext password for now.
nano /etc/dovecot/conf.d/10-auth.conf- Set
disable_plaintext_auth = no
- Set
- Log in again with
http://webmail.<yourdomain>.est/roundcubeand try to log in:- User:
mailtester - Password:
12345 - Server:
<yourdomain>.est(e.g. teacher.est) - it should now work.
- take a look at dovecot.log again
cat /var/log/dovecot/dovecot.log.
- User:
As you understood having webserver with no security is a bad idea, all browsers would warn you about the site and everybody could listen / analyse your network traffic.
Apache: Secure Sockets Layer (SSL)
Nowadays everybody is in the internet kids, experts, grannies etc... but also bad guys like hackers, NSA and so on..., therefore its System Administrators job to protect technically less educated users from all the bad in the internet. In order to do that most modern browsers use a clear sign and green color if your information is safe and red color if something is wrong. When providing web services that use user names and passwords for authentication, you should always encrypt the traffic between the web server and the browser. This can be done using SSL/TLS. HTTP over SSL/TLS is called HTTP Secure (HTTPS). Port tcp/443 is used for HTTPS.
Before the the SNI support the SSL with name-based virtual hosting was not possible (on the same IP, see problem section). However things change and as of 2011 most web browsers and SSL libraries have implemented support for SNI. Today we are using its newest version called TLS and feel free to read more about it here https://en.wikipedia.org/wiki/Transport_Layer_Security
Each SSL virtual host used to have its own certificate. We have already created a self-signed certificate used by SMTP and IMAP servers to initiate TLS connections. Same process can be used to create self signed certificates for the HTTPS web hosts, but it would result in a warning and a non-removable "Not secure" tag on your web server. Result would end up looking something like this...

Therefore we must create something called CA (Certificate Authority) signed certificate. Normally major trustworthy CA-s keys are included in modern updated web browsers (Firefox, Chrome, Internet Explorer, etc) and therefore out-of-the-box trusted. But getting your own signed certificate from public CA can take time, money and in our case (semi-public DNS names) it would not work. Therefore we must act as our CA and import CA root certificate manually to our web browser.
Our old CA certificates have been expired, so there is a manual of how to update the ones you create here! Ca-update
- First create a folder
/etc/ssl/cacertand change your working directory to it ( PS! All following command execute at/etc/ssl/cacertfolder). # cd /etc/ssl/cacert# cp /etc/ssl/openssl.cnf /etc/ssl/cacert/openssl.cnf# wget http://www.ut.ee/~alop/cacert.pem# wget http://www.ut.ee/~alop/cakey.pem# mkdir certs crl newcerts private# echo 01 > serial# touch index.txt# nano openssl.cnf- Find the block
[ CA_default ]section and under it configuredir = /etc/ssl/cacertunique_subject = no(uncomment)default_md = sha512
- Find the block
[ req ]section and under it configure:default_bits = 4096
- Find the block
[ req_distinguished_name ]section and under it configure:countryName_default = EEstateOrProvinceName_default = TartumaalocalityName_default = Tartu(you must add it manually to correct place)0.organizationName_default = System Administration courseorganizationalUnitName_default = Institute of Computer Science
- Find the block
[ usr_cert ]section and under it configure:subjectAltName=@alternate_names
- Add the block at the end of file
[ alternate_names ]
[ alternate_names ]
DNS.0 = *.<yourdomain>.est
DNS.1 = <yourdomain>.est
DNS.2 = mail.<yourdomain>.est
- Save the changes.
Everybody will use same CA certificates to sign your server certificate with. Teachers created it for you with a command ... (DO NOT execute this command it is here for informational purpose only $openssl req -new -x509 -keyout /etc/ssl/cacert/private/cakey.pem -out /etc/ssl/cacert/cacert.pem -config /etc/ssl/cacert/openssl.cnf). In real world you would have to make a certificate request send it to CA and in few days get answer. To speed things up we will give you also CA private key that normally is very-super-extra SECRET thing but as our CA certificates are only used for educational purpose we can afford to make that "BIG" mistake.
# cd /etc/ssl/cacert- makes sure you are in right folder# wget -O private/cakey.pem http://www.ut.ee/~alop/cakey.pem- Download CA secret private key.# wget -O cacert.pem http://www.ut.ee/~alop/cacert.pem- Download ca public key
Let' generate the new private key first:
# openssl genrsa -out newkey.pem 4096
Now lets make certificate request for your domain
# openssl req -new -key newkey.pem -out newreq.pem -days 360 -config /etc/ssl/cacert/openssl.cnf- If asked use
ENTERto select default value fromopenssl.cnfor if needed provide a new one Country = EEState = TartumaaLocality = TartuOrganization = System Administration courseOrganizational Unit = Institute of Computer ScienceCommon Name = *.<yourdomain>.est- THIS MUST BE CHANGEDEmail = debian@<yourdomain>.estA challenge password []:- leave empty (hitENTER)An optional company name []:- leave empty (hitENTER)
- If asked use
Now you should sign a certificate with CA private key you downloaded earlier
# openssl ca -config /etc/ssl/cacert/openssl.cnf -policy policy_anything -out newcert.pem -infiles newreq.pem
It should ask for a CA private key password that would be "casecurepass" and 2 times Y to confirm signing process.

Copy newly created keys to proper folders and fix file permissions
# cp newcert.pem /etc/ssl/certs/server.crt# cp cacert.pem /etc/ssl/certs/cacert.crt# cp newkey.pem /etc/ssl/private/server.key# chgrp ssl-cert /etc/ssl/private/server.key# chmod g+r /etc/ssl/private/server.key# chmod a+r /etc/ssl/certs/server.crt# chmod a+r /etc/ssl/certs/cacert.crt
SSL-related site configuration directives can initially be found in the /etc/apache2/sites-available/default-ssl.conf file. We will use this as the template and create the configuration for the virtual hosts in separate files.
You should be familiar with the following Apache httpd configuration directives before moving to the next task: SSLEngine SSLCertificateFile and SSLCertificateKeyFile SSLCACertificateFile
- Enable
sslmodule- You are expected to know how to do it already so no exact command given.
Set the SSL parameter in /etc/apache2/apache2.conf file. (Because we use multidomain-certificate we dont have to specify SSL parameters separately for each virtualhost as they would be exactly the same anyway.)
SSLCertificateFile /etc/ssl/certs/server.crt
SSLCertificateKeyFile /etc/ssl/private/server.key
SSLCACertificateFile /etc/ssl/certs/cacert.crt
Repeat for all virtual hosts:
- Copy the original configuration file for a virtual host to
<original-virtual-host-file-name>.ssl.conffile (e.g.webmail.teacher.est.ssl.conf- For example, if the original configuration file for
www.teacher.estiswww.teacher.est.conf, then the new file should bewww.teacher.est.ssl.conf.
- For example, if the original configuration file for
- Copy all SSL related directives lines from
default-ssl.conffile to<original-virtual-host-file-name>-ssl.conf.- Do not copy whole file only parts (paramters) needed for SSL to work. If in doubt refer to manual https://httpd.apache.org/docs/2.4/ssl/ssl_howto.html
- Edit the
<original-virtual-host-file-name>-ssl.conffile:- Change
<VirtualHost *:80>to<VirtualHost *:443> - check the
SSLEnginedirective is set toon
- Change
- Enable
<original-virtual-host-file-name>-sslsite (a2ensitecommand)
If the configuration for all virtual hosts is done, proceed with this:
- Add the firewall rules to accept packets on port
443/tcp- You dont have to enable specific Security group because
webgroup we added to your VM earlier already allows connections toHTTPSport443
- You dont have to enable specific Security group because
- In the global SSL configuration (module ssl conf file) in
/etc/apache2/mods-enabled/ssl.confsetSSLStrictSNIVHostChecktoOnas we want to deny the access for non-SNI clients to our name based virtual hosts (old browsers). - There is a chance that symbolic links to your new certificates needs to be updated so here is the command that at least in teacher.est solved :tlsv1 alert unknown ca: SSL alert number 48 errors that prevented users from using TLS.
# update-ca-certificates --fresh
- Restart the Apache web server
Now you should be able to see your HTTPS virtual host in the web browser:
- Open for example
https://www.<your-domain>.estwith your browser- you must create a security exception for your self-signed certificate
- We are still getting errors as we have not imported the CA root certificate in our browsers yet.
- Nevertheless, you should see the same content as on the
http://www.<your-domain>.est
- you must create a security exception for your self-signed certificate
- You must download
cacert.pemfile from http://www.ut.ee/~alop/cacert.pem to your host machine (any folder is good) and then import it into browser.- In Firefox import
cacert.pembyEdit -> Preferences -> Advanced -> Certificates -> View Certificates -> Authorities -> Import -> Select File -> ... - In Chrome
Setting -> Show advanced settings ... -> Manage certificates -> trusted Root Certificate Authorities -> Import -> Next -> File name: rootCA.pem ; type: All Files *.* -> Next -> Place all certificates in the following store; Certificate store: Trusted Root Certification Authorities -> Finish -> Yes -> OK - Close browser and try again (error "Not Secure" should be removed.
- In order to see Certificate info in
ChromepressCTRL+SHIFT+iand in the windows that opens choosesecuritytab andView certificate->Details.
- In order to see Certificate info in
- In Firefox import
- Now also try with
https://webmail.<your-domain>.est/roundcube. You should see the same content ashttp://webmail.<your-domain>.est. (you should see no error even first time) - If the other virtual hosts also work like
https://www.<your-domain>.estandhttps://webmail.<your-domain>.est, then you have configured them correctly.
Our old CA certificates have been expired, so there is a manual of how to update the ones you create here! Ca-update

Display information about certificate in Apache
In info.<yourdomain>.est.ssl.conf add/modify following lines
SSLVerifyClient optionalSSLVerifyDepth 2
SSLOptions +StrictRequire
<FilesMatch "\.(cgi|shtml|phtml|php)$">
    SSLOptions +StdEnvVars +ExportCertData
</FilesMatch>

ScriptAlias "/cgi-bin" "/usr/lib/cgi-bin/"
<Location "/cgi-bin">
  RemoveHandler server-status
  SetHandler cgi-script
  DirectoryIndex env.cgi
</Location>
Create a new script file with a command
# nano /usr/lib/cgi-bin/env.cgi:- Add following content into it...
#!/bin/bash

cat <<EOF
Content-type: text/html

<html>
<pre>
`env`
</pre>
</html>
EOF
exit 0
Give it execute rights
# chmod +x /usr/lib/cgi-bin/env.cgi- Enable
cgiApache module# a2enmod cgi - restart Apache service
Visit the page https://info.<your-domain>.est/cgi-bin
- It should display information about your certificate now.
Finishing configuring roundcube
Earlier we did not finish setting up roundcube and we also allowed plain-text login which is "bad" idea in real world.
First of all lets enable roundcube only for webmail.<yourdomain>.est
- Disable plaintext logins again in
dovecotconfiguration - In
/etc/postfix/main.cfchange postfix certificates to new ones we are usingserver.crtandserver.key - In
/etc/dovecot/conf.d/10-ssl.confchange dovecot certificates to new ones we are usingserver.crtandserver.key - Add/modify following lines into
webmail.<yourdomain>.est.ssl.conffile
DocumentRoot /var/lib/roundcube
Include conf-available/roundcube.conf
- These lines will change webmail document root to roundcube folder and include roundcube configuration to webmail virtualhost site only.
- Specifying which server to use every time when user connects in roundcube can be tedious and annoying task.
- Edit
/etc/roundcube/config.inc.php:- Modify configuration variable
$config['default_host'] - Set new value to
'tls://<yourdomain>.est'- Here
<yourdomainhas to be replaced with your actual domain name
- Here
- Modify configuration variable
- Edit
Now lets disable roundcube config for other sites that secure webmail
# a2disconf roundcube
Its always good idea to check Apache config file syntax
# apachectl configtest
Restart postfix, dovecot and apache2 services to apply new configuration
# service postfix restart# service dovecot restart# service apache2 restart
Roundcube should now work only from https://webmail.<yourdomain>.est and https://webmail.<yourdomain>.est/roundcube
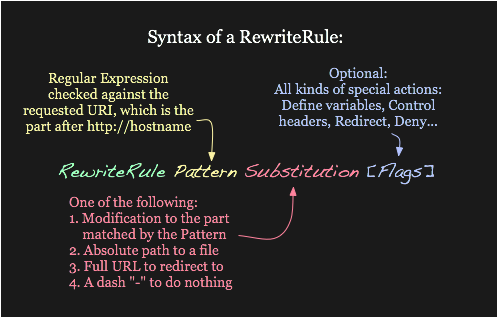
Apache Rewriting
The Apache module mod_rewrite is a very powerful and sophisticated module which provides a way to do URL manipulations. With it, you can do nearly all types of URL rewriting that you may need. It is, however, somewhat complex, and may be intimidating to the beginner. There is also a tendency to treat rewrite rules as magic incantation, using them without actually understanding what they do. So we leave this part for self study and require comprehensive understanding for it only from a student who desire A grade from exam. According to Apache its sometimes easier and better to use Redirect instead http://httpd.apache.org/docs/current/rewrite/avoid.html
Configure Redirect to all of the HTTP conf sites to automatically send users to HTTPS pages instead.
- In all of the HTTP configuration files add following line just after
ServerNameparameter.Redirect "/" "https://<sitename>.<yourdomain>.est/"where<sitename>your subsite (i.e. www, info, test, webmail)<yourdomain>your domain name (e.g teacher, alop, artjom85)
- restart Apache server
- Configure a redirect / rewrite / Alias for
http://webmail.<your-domain>.est/roundcubeso that it redirects tohttp://webmail.<your-domain>.estand do the same for the SSL version ofwebmail.conf.- You would be tempted to use
URL Aliasingbut remember that we already have one/roundcubealias in/etc/apache2/conf-available/roundcube.confAlias /roundcube /var/lib/roundcube.
- You would be tempted to use
Check that https://webmail.<your-domain>.est/roundcube is correctly sent to https://webmail.<your-domain>.est
Now we also would also like that all requests to mail.teacher.est would be sent to mailserver webmail.<yourdomain>.est
We really dont want to use rewrite conditions yet so lets do more magic ... in webmail.<yourdomain>.est.conf and in webmail.<yourdomain>.est.ssl.conf virtualhost files specify following parameter just after ServerName
ServerAlias mail.<yourdomain>.est
It basically tells your webserver that webmail.<yourdomain>.est.conf will also server any request made to mail.teacher.est. This time we dont even want to redirect users because mail.<yourdomain>.est is actually shorter and makes more sense.
Check that mail.teacher.est is served by roundcube over HTTPS
TODO here needs to be added rewrite task that can not be done by Redirect or Alias
- Enable
rewritemodule:# a2enmod rewrite
Working and secure web server
Congratulations that you are still with us. It took lab instructors numerous days to create this lab manual for you so now lets see that us and you did not miss anything.
- Any
HTTPsite/subdomain should redirect you to sameHTTPSsite- e.g.
http://webmail.teacher.estwill redirect usershttps://webmail.teacher.est
- e.g.
- Following addresses should be working also for your domain... (here we add teacher.est examples)
https://www.<yourdomain>.est- will display list of available working links in your domain.https://www.<yourdomain>.est/~tester- Will display page served from/home/tester/public_htmlhttps://www.<yourdomain>.est/~debian- Not Foundhttps://www.<yourdomain>.est/~mailuser- Forbiddenhttps://webmail.<yourdomain>.est- will serve working secureroundcubehttps://webmail.<yourdomain>.est/roundcube- will be redirected tohttps://webmail.<yourdomain>.esthttps://mail.<yourdomain>.est- should be served by ServerAliashttps://mail.<yourdomain>.esthttps://info.<yourdomain>.est- Shows server-status (accessible only from specific IP-s and info.<yourdomain>.est subdomain.https://info.<yourdomain>.est/server-status- Shows server-statushttps://info.<yourdomain>.est/server-info- Shows detailed apache server-infohttps://info.<yourdomain>.est/phpinfo- Shows phpinfohttps://info.<yourdomain>.est/cgi-bin- Shows certificate infohttps://test.<your-domain>.est/secure- httpasswd secure log in pagehttps://test.<your-domain>.est/pam- pam secure log in pagehttps://test.<your-domain>.est/images- Will display a list of images in/home/tester/funny-pictures
Take a look at example <yourdomain>.est landing page here https://www.teacher.est/
- PS! teacher.est allows access from any IP and also
HTTP->HTTPSrewrite rules are not always active for demonstration purposes. Therefore you can always test your connection and behavior of server against teacher.est similar subpage.
- PS! teacher.est allows access from any IP and also
Hint for exam (roundcube quick setup)
There is a nice command dpkg-reconfigure roundcube-core that can quickly reconfigure (reset) roundcube configuration for you. PS! Completing these tasks will reconfigure roundcube
# dpkg-reconfigure roundcube-coreIMAP server(s) used with RoundCube-tls://<yourdomain>.estDefault language-en_USReinstall database for roundcube?-YESConnection method for MySQL database of roundcube:-Unix socketMySQL database name for roundcube:-roundcubeMySQL username for roundcube:-roundcubeadmin@localhostMySQL application password for roundcube:- leave blank (EMPTY)Confirm password- leave blank (EMPTY) -> errorMySQL application password for roundcube:- leave blank (EMPTY)Name of the database's administrative user:-rootWeb server(s) to configure automatically:-apache2Should the webserver(s) be restarted now?-YES